Showing posts with label Seth Apter. Show all posts

Thursday, August 1, 2019

Denim Junk Journal


A junk journal I created using some denim from a pair of old jeans, bits of lace and string, old sheets of music, paper I dyed with inks and/or tea, and the "Denim & Girls" Collection by Maja Design (that came in the July 2019 Tres Jolie Kit Club Scrapbooking Kit).

Videos:

Flip Through


Process Part 1: Cover


Process Part 2: Inside


Products:

  • [From the] Tres Jolie July Scrapbook Kit
    • Creative Embellishments
      • Grunge Heart Corner
    • Maja Designs
      • Demin & Girls Collection
    • Blue Mini Clothespins
    • Pink Tags
  • idea-ology
    • Tim Holtz
      • Jute String
      • Sanding Block
  • Ranger
    • Emboss It Dauber
  • Emerald Creek
    • Seth Apter
      • Baked Texture
        • Deep Sea
  • Simon Says Stamp
    • Embossing and Watermark Ink
      • Clear
    • Embossing Powder
      • Ultra Fine Steel Navy
  • Prima
    • Finnabair
      • Wax Cire Cera
        • Old Denim
  • Fiskars
    • 1" Circle Squeeze Punch
  • We R Memory Keepers
    • Envelope Punch Board
  • Daiso Japan
    • Lace Trim Set, Blue
  • Heat n Bond
  • E6000
  • Art Glitter Glue
  • Fabri-Tac
  • Unbranded/Unknown
    • Corner Punch
    • Paper Clips
    • Hole Punch
    • Pink/White Twine
    • Teal/White Twine
    • White Laces
    • Wide Blue Lace
  • Other
    • Old Jeans!

Friday, May 31, 2019

Altered Box - ReneaBouquet May Swap!


Altered 'cigar' box for the May 2019 ReneaBouquet Facebook Swap!
**Someone mentioned the word 'tutorial,' and I'll try that here as best I can...

I do have a computer and a webcam and everything, BUT in early 2018 the power supply on my computer fried itself...I mean there were sparks and everything! And well my computer works well enough-ish, I'm pretty sure the motherboard took some damage because it hasn't been quite right since (and my webcam tends to overpower it now). All this happened right before we moved almost 2300 miles, so getting my computer back to 100% hasn't been a priority! (Although dealing with it being like 85% is starting to get on my nerves A LOT!)**

Ok...the short and sweet "tutorial."

I used Art Glitter Adhesive to hold the papers to the wood. The lid has the 13 @rts paper, and the bottom is only wrapped on the sides with the Hip Kit Club paper (the bottom of the box is just white gesso). I used quite a bit of glue, basically "painting" a thin layer where it would be touching the paper and burnishing it down with the edge of my bone folder and some elbow grease. And I let it dry a full day before moving on to the next layer!

I did not gesso my paper, gesso is wet and I found that to be a risk I didn't want to take! I used Krylon Workable Fixative as a protective coating before gluing down the Mould pieces, flowers, 7 Gypsies doilies, and ReneaBouquet Grid Beautiful Board. All of these parts, except the Beautiful Board which has it's own coating, needed gesso before the next step.

Next I did the bits of embossing.

Now, the really wet, "please let the glue and Krylon work their best," part! First, I had to spritz water where I was planning on adding all those Lindy's & Jaquard powders, then I had to add more water on top of the powders! I did heat dry, and there is more than one layer of powders (Between the layers I used more Krylon Workable Fixative so there would be no reactivation of the lower levels!). I did the same technique along the sides of the bottom, except there was only one layering of powders. And, because I heat dry the powders, it reheated the embossing powder which caused it to push it's way through in spots!!

Now, to help everything withstand being used, there is three (I think) coats of (Mod Podge) acrylic sealer. Some is glossy, some is matte. Yes, I did it that way on purpose!

After all that was dry I added the feet, hinges, and latch, then the butterflies and cabachon.

*The cabachon is a 50mm dome on top of a piece from Tim Holtz's Botanical Layers & a ReneaBouquet butterfly, adhered with JudiKins Diamond Glaze. The edges are done with Finnabair waxes, White Gold & Peacock.*


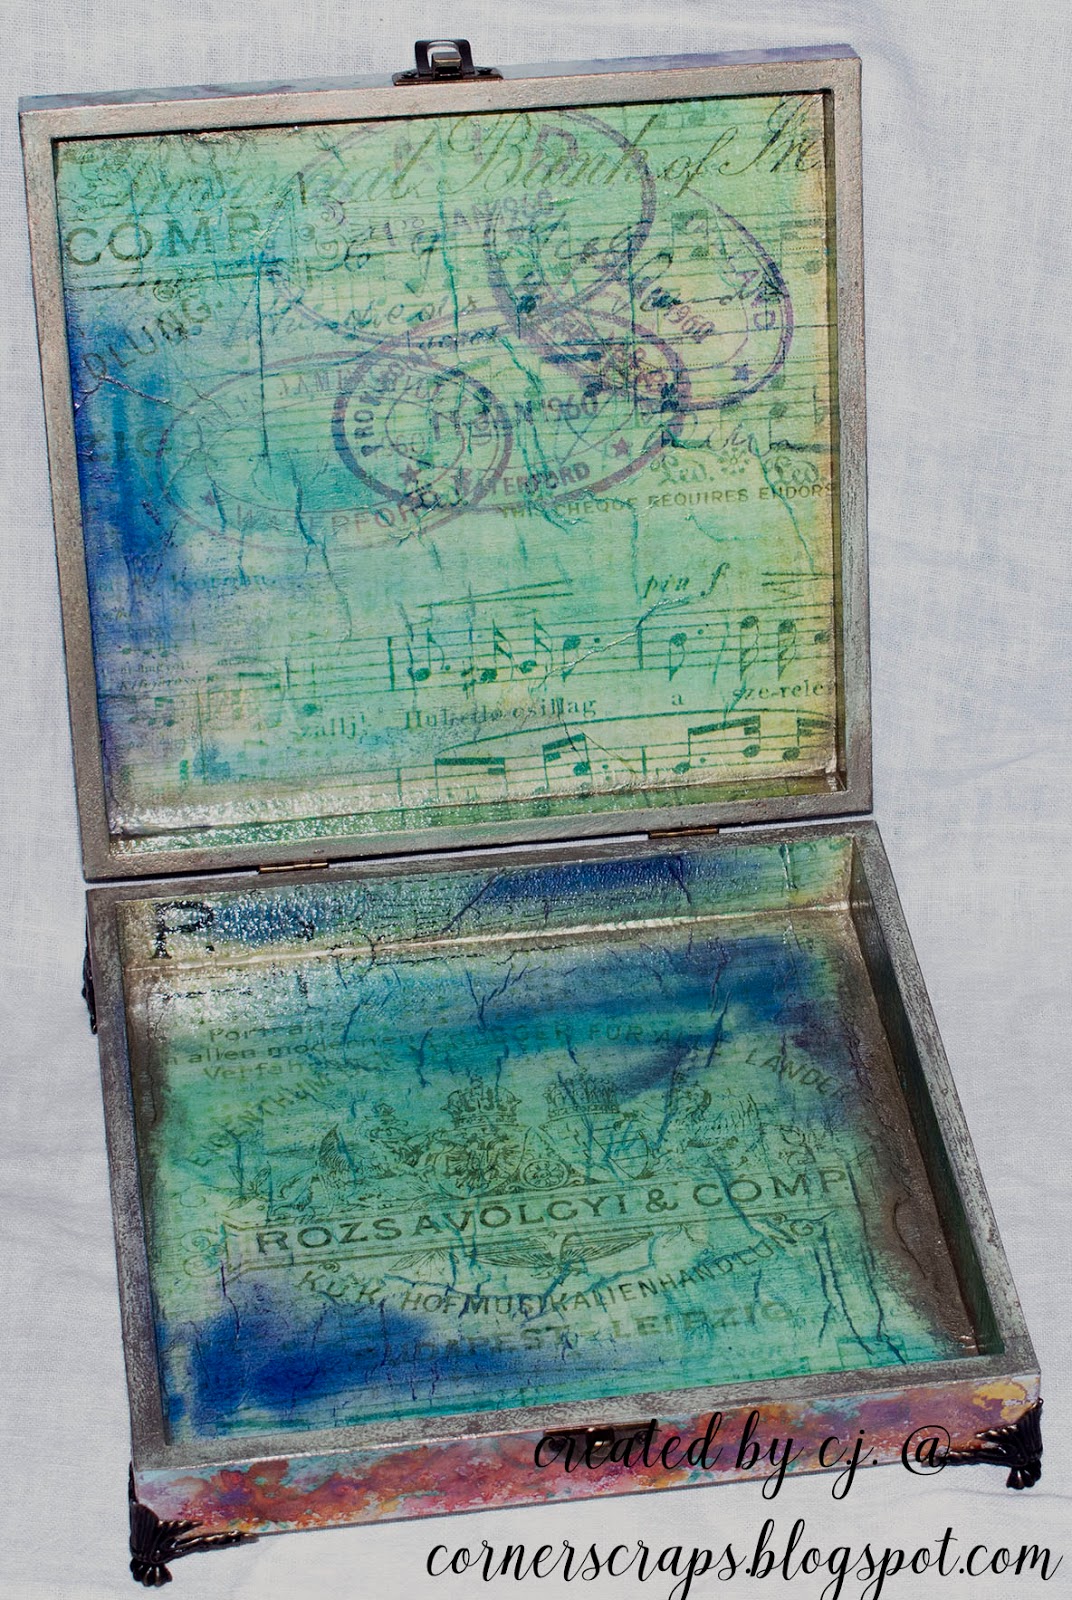
On the inside of the box I used Mod Podge Vintage to glue the Prima tissue paper in place then let that dry. After the Mod Podge dried I randomly added spots of color with the Finnabair Waxes and coated the edge of the lid and bottom with Finnabair wax. And everything is coated in acrylic sealer to (hopefully) add durability.


Products:
  • ReneaBouquets
    • Beautiful Board - Grid Elements
    • Butterfly Kisses
      • Delicate Beauty (the black & white butterflies)
    • Magical Miniatures
      • My Romantic Heart (the butterfly under the cabochon)
  • 13 @rts
    • Aqua Flora
      • Countless Love
  • Hip Kit Club
    • Color Dazzel
      • Rainbow
  • Art Anthology
    • Lotus Stencil
  • Lindy's
    • Magical Shaker
      • Alpine Ice Rose
      • Bratwurst Brown
      • Grab A Guy Gold
  • Jacquard
    • PearlEx
      • Reflex Violet
      • Misty Lavender
  • Emerald Creek
    • Seth Apter
      • Baked Texture
        • Patina Oxide
  • Ranger
    • Big Emboss It
  • 7 Gypsies
    • Architextures
      • Doilies
  • idea-ology
    • Tim Holtz
      • Botanical Layers
  • Prima
    • Finnabair
      • Art Alchemy Wax
        • Vintage Silk
        • Mint Sparkle
        • Peacock
        • Electric Violet
        • White Gold
      • Mould
        • Mechanica
      • Tissue Paper
        • Musica
      • Heavy Body Gel
  • Unknown/Unbranded
    • Cabochon
    • Box feet
  • **I think the box is Darice (Cigar Box)

Sunday, March 31, 2019

Flight of Fancy Canvas

My 8x10 canvas for the March More Than Words Main Challenge! Fantasy + Wings
This month the main challenge over on the More Than Words Blog was to be inspired by "Fantasy & Wings." For me, fantasy always makes me think of fairies. If it's fantasy, there's going to be some kind of fae involved! This month I also had pastes on my mind, and I happen to have a nice set of Finnabair's Fantasy Rust Effect Paste...which goes with the fact that I also love using purple, teal (turquoise), and blue together...especially with fantasy!

I may not have had a fairy that I could get to "fit" on this canvas, and I have a few different chipboard fairies, I did have a handy-dandy fairy door from Creative Embellishments! I also happened to have the Astral Pink Butterflies from ReneaBouquets, and the color on them is
just beautiful...and perfect for my piece!
More Than Words Main Challenge - March 2019

I love the cells that the paint pour created along this edge!


Baked Texture - Patina Oxide on the door & Ancient Amber on the leafy frame!


I love, love, LOVE these butterflies ... I think I may need to make a stockpile!

**For the record - no, everything wasn't dry yet, I was running out of month!!**

Products

  • ReneaBouquets
    • Astrial Pink Premium Paper Glitter Glass Butterflies
    • Teal Shard Glitter Glass
    • Gold Glitter Glass
  • Creative Embellishments
    • Fairy Door (Set 1)
    • Leafy Vine Frame
  • Prima
    • Finnabair
      • 3D Gloss Gel
      • Rust Effect Paste
        • Purple
        • Turquoise
        • Powder Blue
  • Emerald Creek
    • Seth Apter Baked Texture
      • Ancient Amber
      • Patina Oxide
  • Ranger
    • Emboss It Dabber
  • Simply
    • Acrylic Paint
      • Mixing White
  • Master's Touch
    • Acrylic Paint
      • Gold
  • Dina Wakley
    • Acrylic Paint
      • Eggplant
      • Peacock
    • Cell Creator
  • Liquitex Pouring Medium
  • Unknown/Unbranded
    • 8x10 Canvas
    • Texture Pebbles
    • Feather Moulds
    • Cheesecloth

Saturday, March 30, 2019

Adventure - Mini Album

Mini Album for the March Creative Embellishments Challenge!
This months challenge over on the Creative Embellishments Blog was to "...be inspired by 1 element from the photo below (let us know what it is) and by this quote: 'Every great adventure requires a first step.'"

I was inspired by the color! I love using black and white...especially when I just happen to have some lovely black & white papers that need to be used!

Inspiration photo for the March Creative Embellishments Challenge!
For the album I cut a thick piece of chipboard to use as a spine with the Creative Embellishment's 5-page Square Mini Album, and I just had to add the Stars In My Universe Frame (also from Creative Embellishments), with some Rocky Road Baked Texture on it, to the cover!

Cover
Inside cover & page 1
Pages 2 & 3


Pages 4 & 5

Pages 6 & 7

Page 8 and inside back cover

Products:
  • Creative Embellishments
    • Square Mini Album
    • Stars In My Universe Frame
  • Silhouette
    • Cameo 3
    • Curio
    • Pen Holder
    • Cut Files: Tags & Tabs
  • Ranger
    • Emboss It Dauber
    • Tim Holtz
      • Distress Oxide: Black Soot
  • Emerald Creek
    • Backed Texture
      • Rocky Road
  • Idea-ology
    • Tim Holtz
      • Mini Stapler
  • 13@rts
    • Rose Fields
      • Natural Beauty
      • Letters to Rose
    • Aqua Flora
      • Shades of Black
  • Prima
    • Flirty Fleur Collection
      • Something Floral
      • Pretty Birds
      • So Lovely
  • Crate Paper
    • Maggie Holmes
      • Flourish
        • Charming
  • Hip Kit Club
    • Kim Watson
      • Amber Star
        • Sparkle
  • Pink Paislee
    • Paige Evans
      • Turn The Page 07
  • Simon Says Stamp
    • Black Cardstock
  • American Crafts
    • White Cardstock
    • Thickers
      • Hello Joy
  • We R Memory Keepers
    • Crop-A-Dile & Eyelets
  • Art Glitter
    • Adhesive
  • Simply White Gesso
  • Folk Art Chalkboard Paint
  • Unknown/Unbranded
    • Twine
    • Ribbon/Fiber
    • Black Pen (I've had for YEARS...I'm actually impressed it still worked!)

Thursday, May 31, 2018

Altered Jar!

An altered jar I made, mostly just to see where it would go, but also entered in the May (2018), Reneabouquets Mood Board Challenge on Facebook.

The jar I've had sitting around for a while, the top I found while digging up part of the yard last month, and the butterfly was left hanging on a stump by the previous owners. I washed everything up and set them aside without any plan for them at the time, but I decided to see what I could glue together this month.

After I added the Moulds to the jar, I coated everything with white gesso, then started layering on the paints & when I thought that was too "bright" I decided I should FINALLY try out the Baked Textures!

That mass of "netting" on the underside of the top piece is actually some "spider web" I picked up at the 99¢ store this past Halloween! I needed something to...cover...the top of the bottle, but I also wanted something different. After I got the "web" on I just randomly dribbled some JudiKins Diamond Glaze on and added the Silver Pink Shard Glitter Glass from Reneabouquets!


To add some shine to the butterfly, that was painted with Vicki Boutin paints, I added Diamond Chunky Glitter Glass from Reneabouquets!


The jar was painted with Prima's Opal Magic "Blue Gold" on the bottom side of the flourishes, and Prima's Sparks "Mermaid Sparkle" above the flourishes, while the flourishes themselves were painted with Opal Magic "Yellow-Blue" before having a layer of "Ancient Amber" Baked Texture added!


A close up of the beautiful, handcrafted flowers from the Reneabouquet Shop! For the coloring of the lid, I mixed some "Mermaid Lagoon" Distress Oxide with some Vicki Boutin Iridescent Glaze, spritzed in a bit of water for easier mixing, and painted it on! And that rust all over? "Chunky Rust" Baked Texture! Absolutly Awesome!


Product List:
  • Reneabouquet Exclusive Products: 
    • Diamond Chunky Glitter Glass 
    • Silver Pink Shard Glitter Glass 
    • All of the flowers and leaves! (From a couple "Teal and White" sets) 
  • Seth Apter/Emerald Creek: Baked Texture: 
    • Ancient Amber (Keyhole & Flourishes - After painting Yellow-Blue) 
    • Deep Sea (Butterfly Body) 
    • Chunky Rust (for the rust) 
  • Ranger Perfect Medium™ brush 
  • American Crafts - All The Good Things Collection - Mediums - Acrylic Color Pop
  • American Crafts - Mixed Media Collection - Glaze - Iridescent
  • Ranger Ink - Tim Holtz Distress Ink Pads - Embossing Ink Clear
  • Prima - Iron Orchid Designs - Vintage Art Decor Mould - Large Fleurish
  • Prima - Finnabair - Art Alchemy - Acrylic Paint - Opal Magic - Yellow Blue
  • Prima - Finnabair - Art Alchemy - Acrylic Paint - Opal Magic - Blue Gold
  • Prima - Finnabair - Art Alchemy - Sparks Acrylic Paint - Mermaid Sparkle
  • Ranger Ink - Tim Holtz - Distress Oxides Ink Pads - Mermaid Lagoon
  • JudiKins Diamond Glaze
  • Creative Paperclay
  • The netting is actually "spider web" from the 99¢ store I bought back at Halloween.